Using Regsvr32 to Register a File
Dependency files such as OCX files and many DLL files require an entry in the Windows Registry before they become available to the programs that use them. Regsvr32 is a utility that provides the user a quick easy way to register and un-register dependency files. You can run Regsvr32 by clicking the Windows START button followed by clicking RUN and then followed by typing in the command REGSVR32 followed by the full path to the dependency file that you are registering. The RUN textbox off the Windows START button also responds to Drag and Drop. This means that after clicking the Windows START button and clicking RUN and keying REGSVR32 into the open textbox, you can simply drag and drop the dependency file from Windows Explorer rather than typing in the full path to the file. After getting the command line into the textbox, either by typing it out or using drag and drop, simply click OK and Regsvr32 will register the file. Screenshots appear below to illustrate the process of registering a dependency file.
Drag and Drop
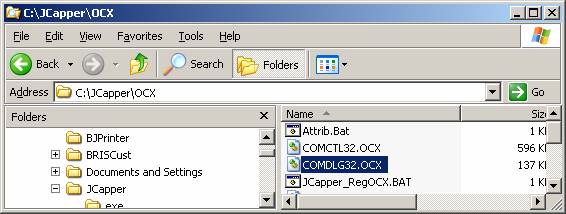
- Open Windows Explorer (right click the START button and select Explore.) Navigate to C:\JCapper\OCX. Find the file named COMDLG32.OCX and give it a single click to highlight it. Your windows explorer window should look like the illustration shown above.
- Click the Windows START Button and select RUN. An Open textbox will appear.
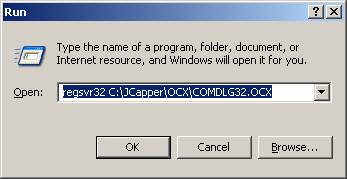
- Type REGSVR32 into the Open textbox. Then DRAG the highlighted file (com32dlg.ocx) from the open Windows Explorer window and DROP it into the RUN textbox just to the right of the regsvr32 command. as shown below. After doing this your Open textbox will look like the illustration below. After that click the OK button on the Open textbox. Regsvr32 will register the dependency file and you will get a registration successful message.
Q. How do I enable the RUN dialog on the Windows Vista Start Menu?
A number of people have asked me how to enable the old Run dialog that existed on every other version of Windows until Vista.
You can always get to the run dialog by just hitting Win + R on the keyboard, which is the simplest way to do so, and would probably be worth getting used to.
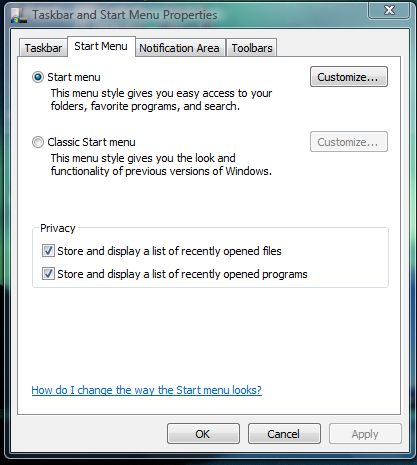
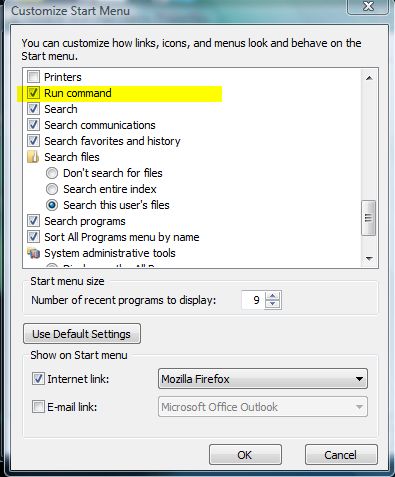
Otherwise, you can re-enable the run dialog by right-clicking on the Start Button, selecting Properties, and then clicking Customize on the ensuing dialog window. You'll be taken to the Customize Start Menu screen.
Check the "Run command" checkbox and save your settings. Afterwards, this is what you should see:
Or…
Manual Procedure
Single click the Windows START button and select RUN. Type the following command line into the RUN textbox:
REGSVR32 C:\jcapper\ocx/comdlg.ocx
Your Open textbox should look exactly like the illustration shown above. After you have the correct command line typed in, click the OK button. Regsvr32 will register the dependency file and you will get a registration successful message.
Where to find dependency files required by JCapper
All of JCapper’s dependency files can be found in the following folder:
C:\JCapper\OCX
On some systems it may be necessary to use regsvr32 to register one or more of these files in order to get JCapper to run properly. If you try to run JCapper and get an error message about a missing dependency file, then using regsvr32 to register that dependency file is the treatment of choice.
Author: Jeff Platt
Last Modified: 10/18/2008