Rider Changes Help Doc
TABLE OF CONTENTS:
- GENERAL OVERVIEW.
- Enhanced Settings that control Rider Changes.
- Spotting Unresolved Rider Names on the Changes Table Report.
- BASIC OPERATING INSTRUCTIONS for using the CXNNames Table Interface to create a Resolved Rider Name entry in the CXNNames Table.
- BASIC OPERATING INSTRUCTIONS for using the Resolved Rider Names Wizard to create a Resolved Rider Name entry in the CXNNames Table.
- BASIC OPERATING INSTRUCTIONS for using the Manual Rider Changes Screen to key and process manual rider changes.
- BASIC OPERATING INSTRUCTIONS for Connecting to a JCapper .mdb File.
<-- Back to Table of Contents
GENERAL OVERVIEW
Rider Changes in Scratch BOT:
Starting with all versions of JCapper Build 198 published 11-30-2016 and later, Scratch BOT now gives you the ability to process Rider Changes parsed from the XML - for users of BOTH HDW and Brisnet data files.
This process involves:
- Turning Rider Changes 'ON' by persisting the correct settings in the Enhanced Settings Module.
- Clicking the XML button in Scratch BOT to Parse replacement rider names from the XML.
From there Scratch BOT will:
- Resolve replacement rider names parsed from the XML into a format that is compatible with both HDW and Brisnet data files.
- Write (properly formatted) replacement rider names parsed from the XML directly to data files (currently) loaded into JCapper via the DFM Card Loader.
Resolved Rider Names:
Resolved Rider Names entries in the CXNNames Table is the key that makes processing of Rider Changes in Scratch BOT possible.
Processing Rider Changes in Scratch BOT (seamlessly) isn't rocket science - but it DOES require that you understand how to use the CXNNames Table Interface and/or the Resolved Rider Names Wizard to create entries for Resolved Rider Names in the CXNNames table inside of the c:\2004\JCapper.mdb file.
If you are using HDW data - you will find that creating entries for Resolved Rider Names isn't that big of a deal. That's because nearly all of the rider names in the XML can be easily reformatted to create an exact match with the rider names in your data files.
If you are using Brisnet data and you are playing just just a handful of track codes - you'll likely find that creating Resolved Rider Name entries does take some initial setup time. But once you've created entries for each rider at the track codes you are playing - you'll be good to go - with minimal management going forward as new riders appear on the scene.
If you are using Brisnet data and you are playing all track codes - you'll likely find that creating Resolved Rider Name entries is going to take SIGNIFICANT setup time.
That's because (unlike HDW data) most of the rider names in Brisnet data files are different enough than the names in the XML for the same rider - that writing a routine that creates an exact match between the name in the data file and the name in the XML is not an easy task.
Put another way: Very few HDW rider names require a Resolved Name entry in the CXNNames Table. However, most Brisnet rider names do require a Resolved Name entry in the CXNNames Table. (The sheer volume of Brisnet rider names requiring a Resolved Name entry in the CXNNames Table is what makes this a significant effort.)
That said, the process itself for creating Resolved Rider Names entries is the same - whether you are using HDW or Brisnet data files.
The process for creating Resolved Rider Names entries in the CXNNames Table is covered in step by step detail (complete with screenshots) in the sections (below) for both the CXNNames Table Interface and the Resolved Rider Names Wizard.
Manual Rider Changes:
Every now and then a data entry error by a track employee will create a situation where there is a rider change that's not refelcted in the XML.
Every now and then I find myself playing live at some track, otb, or in a tournament ballroom without an adequate internet connection - and I can either hear a new rider change announed - or see a new rider change displayed in the 'crawler' along the bottom of the track video feed.
When the need arises (and it will) the key to handling it - is to bring up the Manual Rider Changes Screen in Scratch BOT - and (quickly) key and persist a manual rider change.
The process for that is covered in step by step detail (complete with screenshots) in the section (below) for the Manual Rider Changes Screen.
About the Table of Contents:
The Table of Contents in this help doc is made up of clickable links. Click a topic you are interested in - and you will be taken to the section for that topic.
To return to the Table of Contents - simply click one of the Back to Table of Contents links found throughout this help doc.
After reading this help doc you should be able to:
- Persist the correct settings in the Enhanced Settings Module to turn Rider Changes 'ON.'
- Spot unresolved rider changes parsed from the xml (in need of attention) on the Changes Table Report in Scratch BOT.
- Use the CXNNames Table Interface in Scratch BOT to persist Resolved Rider Names entries in the CXNNames Table inside of the c:\2004\JCapper.mdb file.
- Use the Resolved Rider Names Wizard in Scratch BOT to persist Resolved Rider Names entries in the CXNNames Table inside of the c:\2004\JCapper.mdb file.
- Use the Manual Rider Changes Screen in Scratch BOT to quickly key and process manual rider changes.
<-- Back to Table of Contents
Enhanced Settings that control Rider Changes:
| Setting Name |
Option |
Description |
| HDW File Mgr Initial Data Folder |
0 Apply DFM Checkbox |
Causes the HDW File Mgr and Scratch BOT to use the checked folder in the DFM upon startup. Disables parsing/processing of rider changes from the XML. |
| HDW File Mgr Initial Data Folder |
-1 Override DFM Checkbox |
Causes the HDW File Mgr and Scratch BOT to ignore checkboxes in the DFM and use Data Folder 1 upon startup. Enables parsing/processing of rider changes from the XML. |
| CXN Names Formatting |
0 Remove Punctuation Characters |
Removes punctuation characters from rider names. Enables parsing/processing of rider changes from the XML. |
| CXN Names Formatting |
1 Punctuation Characters Left Intact |
Leaves punctuation characters intact in rider names. Disables parsing/processing of rider changes from the XML. |
| Scratch BOT |
0 All Scratches in the XML |
Causes Scratch BOT to parse the entire xml stream at once. Enables display of Vet Scratches on the HTML Report. Enables parsing/processing of rider changes from the XML. |
| Scratch BOT |
1 Scratches For Loaded Card Files Only |
Causes Scratch BOT to parses the xml one track at a time and only for track codes currently loaded into JCapper. Disables parsing/processing of rider changes from the XML. |
| Scratch BOT |
2 Block Vet Scratch Display on Reports |
Causes Scratch BOT to parse the entire xml stream at once. Blocks display of Vet Scratches on the HTML Report. Enables parsing/processing of rider changes from the XML. |
| Rider Changes |
0 Rider Changes OFF |
Disables parsing/processing of rider changes from the XML. |
| Rider Changes |
-1 Rider Changes ON |
Enables parsing/processing of rider changes from the XML. |
Screenshot showing the Ehnanced Settings Module - with Rider Changes enabled - and yellow highlighting and red lines applied to the settings that matter:
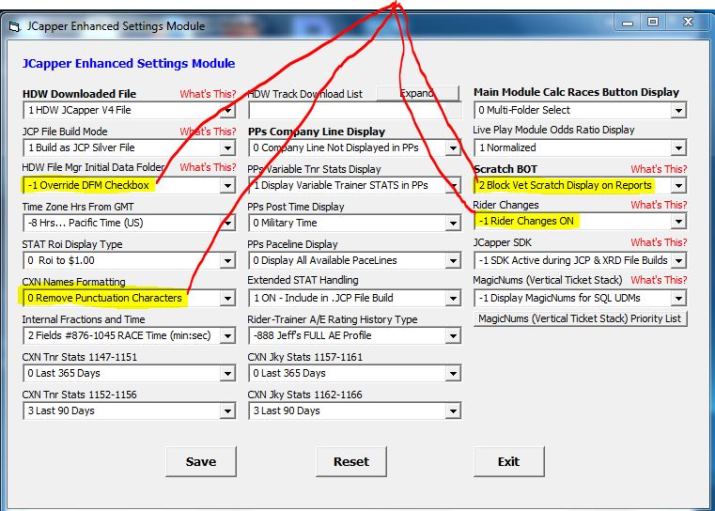
Note that in the above screenshot:
- The HDW File Mgr Initial Data Folder setting is persisted as: -1 Override DFM Checkbox.
- The CXN Names Formatting setting is persisted as: 0 Remove Punctuation Characters.
- The Scratch BOT setting is persisted as: 2 Block Vet Scratch Display on Reports.
Also note that if this setting were persisted as: 0 All Scratches in the XML -- rider changes would still be enabled (although vet scratches would be displayed on the html report.)
- The Rider Changes setting is persisted as: -1 Rider Changes ON.
These four settings - when persisted correctly - are what turns parsing of Rider Changes from the XML in Scratch BOT 'ON.'
Further note that -- persisting these four settings correctly -- together with Resolved Rider Name entries in the CXNNames Table -- are required by Scratch BOT in order to parse and process Rider Changes from the XML seamlessly.
-jp
.
<-- Back to Table of Contents
Spotting Unresolved Rider Names on the Changes Table Report:
To run a Changes Table Report:
- Launch JCapper Scratch BOT.
- Click MENU - select Changes Table Report - and click YES at the prompt to run the report.
Scratch BOT will generate and display the report.
From there, scroll through the report to see changes that were parsed from the XML - and then run a Calc Races for the folder that you ran the XML parse routine for.
New changes are displayed at the top of the report - and are designated with a red 'True' in the 'New' column.
Rider Changes are designated with a ChangeType of 'Rider' with the replacement rider name (as formatted after being parsed from the XML) in the 'New Rider' column.
Resolved Rider Names are designated on the report with a 1 in the 'Status' column and with the replacement rider name displayed in black text.
Other than for handicapping/decision making purposes - resolved rider names don't need your specific attention. You should be able to verfify them after running a Calc Races - and see - in the PPS Generator or on the HTML Report - that each replacement rider name was written to the data file.
Unresolved Rider Names are designated on the report with a 0 in the 'Status' column and with the replacement rider name displayed in red text - along with a red strikethrough.
Unresolved rider names DO need your attention. You should be able to verfify - by looking at rider names in the PPS Generator - or on the HTML Report (even after running a Calc Races) that the replacement rider name HAS NOT been written to the data file -- and therefore needs your attention.
Screenshot showing new rider changes on the Changes Table Report:
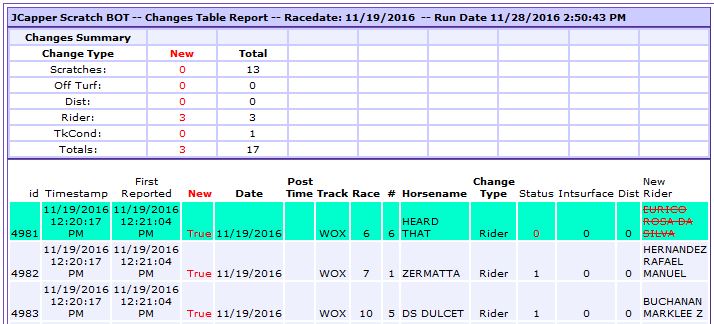
Note that the above screenshot shows a Changes Table Report with an unresolved rider name. You can tell it is an unresolved rider name (and therefore needs attention) because the 'Status' column has a value of '0' and the replacement rider name is displayed in red text with a red strikethrough (instead of plain black text.)
Once you resolve a rider name by creating a proper entry in the CXNNames Table - from that point forward - Scratch BOT will be able to process that rider name each time it is parsed from the XML.
<-- Back to Table of Contents
BASIC OPERATING INSTRUCTIONS for using the CXNNames Table Interface to create a Resolved Rider Name entry in the CXNNames Table:
- Launch JCapper Scratch BOT, click MENU, and select CXNNames Table Interface to launch the CXNNames Table Interface.
The CXNNames Table Interface is a data sheet style interface to the CXNNames table inside of the c:\2004\JCapper.mdb file.
Creating a Resolved Rider Name entry requires entry of valid information in the following data fields:
- Name1 - This data field is designed to contain the rider name (with punctuation characters stripped out) as it appears in the data file.
- Name2 - This data field is designed to contain the rider name (with punctuation characters stripped out) as it appears in the XML.
- NameType - This is a numeric data field.
When the NameType field contains a value of 1 the interface is programmed to recognize the entry comprised by all four fields as an HDW Resolved Rider Name.
When the NameType field contains a value of 11 the interface is programmed to recognize the entry comprised by all four fields as a Brisnet Resolved Rider Name.
- Active - This is a True/False field. When it contains a value of -1 (for True) and when the Name1, Name2, and NameType fields each contain valid data - the interface is programmed to recognize the entry comprised by all four fields as a Resolved Rider Name.
Your job is to get valid data into all four fields - and create a Resolved Rider Name entry - for each rider at the track codes you play.
- Use the vertical scrollbar along the right hand edge of the CXNNames Table Interface to scroll through the existing entries in the table - until you come to the row that contains data for the rider name you want to resolve.
Sorting of rider names for the CXNNames Table Interface is such that:
- HDW Names (NameType=1) are grouped together and displayed first.
- Brisnet Names (NameType=11) are grouped together and displayed next.
- Within each NameType:
- Active entries (those with a value of -1 or True in the Active field) are displayed first.
- Inactive entries (those with a value of 0 or False in the Active field) are displayed next.
If you have recently run a Populate CXNNames Table Routine (or if you are an HDW data customer) chances are good that a Name1 entry exists in the Changes Table for the rider you want to resolve - and that the entry can be found (and edited to become a Resolved Rider Name) using the CXNNames Table Interface.
Hint: The first place you should look when scrolling through the rider names in the CXNNames table - is the Name1 field - of the inactive names - for the correct Nametype (1 for HDW or 11 for Brisnet) that matches the data files you are using.
Important! Double check the NameType before creating an entry. Be very careful about creating entries under the wrong NameType.
Once you find the row for the rider you are working with - click inside of the Name2 field to bring focus to both the Name2 field and that row.
- If the Name1 field is already populated with valid data (and that is the most likely case) -- simply key the unresolved rider name - as it exists on the changes table report (minus the strikeout ) into the Name2 field.
- Key a -1 into the Active field. Then use the tab key (or a mouse click) to move the cursor to a different field or row.
Note that as soon as you move the cursor to a different field or row - the interface writes the value in the field you just vacated to the table. All of the data sheet style interfaces in JCapper behave in this same manner. (Move the cursor to another field or row to write the value in the field just vacated to the table.)
- Edit the NameType and/or Name1 fields as needed.
- Double check your work and x-out of the CXNNames Table Interface.
Screenshot showing the CXNNames Table Interface after creating a Resolved Rider Name entry:
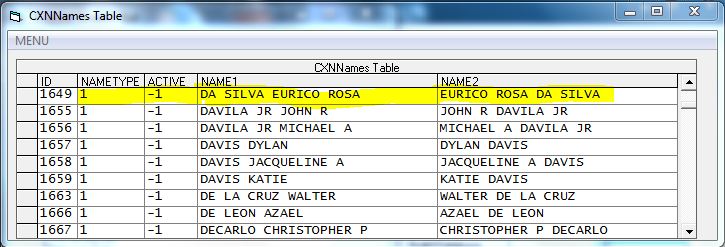
Note that - for the highlighted row - in the above screenshot:
- The NameType field contains a value of 1 to indicate an HDW Rider Name.
- The Active field contains a value of -1 for True.
- The text in the Name1 field matches the rider name in the data file with all punctuation characters stripped out.
- The text in the Name2 field matches the rider name in the XML with all punctuation characters stripped out.
- Collectively - because the Active field contains a value of -1 (for True) -- and because the Name1, Name2, and NameType fields each contain valid data -- the interface will recognize the entry comprised by all four fields as a Resolved Rider Name.
That's It!
Once you resolve a rider name by creating a proper entry in the CXNNames Table - from that point forward - Scratch BOT will be able to process that rider name each time it is parsed from the XML.
-jp
.
<-- Back to Table of Contents
BASIC OPERATING INSTRUCTIONS for using the Resolved Rider Names Wizard to create a Resolved Rider Name entry in the CXNNames Table:
- Launch JCapper Scratch BOT, click MENU, and select Resolved Rider Names Wizard to launch the Resolved Rider Names Wizard.
The Resolved Rider Names Wizard is a wizard style interface to the CXNNames table inside of the c:\2004\JCapper.mdb file.
Creating a Resolved Rider Name entry requires entry of valid information in the following data fields:
- Name1 - This data field is designed to contain the rider name (with punctuation characters stripped out) as it appears in the data file.
- Name2 - This data field is designed to contain the rider name (with punctuation characters stripped out) as it appears in the XML.
- NameType - This is a numeric data field.
When the NameType field contains a value of 1 the interface is programmed to recognize the entry comprised by all four fields as an HDW Resolved Rider Name.
When the NameType field contains a value of 11 the interface is programmed to recognize the entry comprised by all four fields as a Brisnet Resolved Rider Name.
- Active - This is a True/False checkbox. Check the box for True. (Uncheck the box for False.)
Note that if you click the Save button while the Active box is checked: The interface will write a value of -1 (for True) to the Active field in the table.
Also note that when the Active field is True - and when the Name1, Name2, and NameType fields each contain valid data - the interface is programmed to recognize the entry comprised by all four fields as a Resolved Rider Name.
Your job is to get valid data into all four fields - and create a Resolved Rider Name entry - for each rider at the track codes you play.
- Check the Data Vendor box (HDW or Brisnet) to make the interface display rider names for the data files you are using.
If the correct box is already checked - fine. (Just move on to the next step.)
- Use the vertical scrollbar along the right hand edge of the (big) CXNNames Table listbox to scroll through the existing entries in the table - until you come to the row that contains data for the rider name you want to resolve.
Sorting of rider names for the (big) CXNNames Table listbox is such that:
- HDW Names (NameType=1) are grouped together and displayed first.
- Brisnet Names (NameType=11) are grouped together and displayed next.
- Within each NameType:
- Active entries (those with a value of -1 or True in the Active field) are displayed first.
- Inactive entries (those with a value of 0 or False in the Active field) are displayed next.
Also, the data fields displayed in each (single) row of the (big) CXNNames Table listbox (from left to right) are as follows: ID, NameType, Active, Name1, and Name2. (The squiggly line character is used as a field separator.)
If you have recently run a Populate CXNNames Table Routine (or if you are an HDW data customer) chances are good that the Name1 field for the rider you want to resolve can be found in the (big) CXNNames Table listbox.
Hint: The first place you should look when scrolling through the rider names in the CXNNames table - is the Name1 field - of the inactive names - for the correct Nametype (1 for HDW or 11 for Brisnet) that matches the data files you are using.
Important! Double check the NameType before saving an entry. Be very careful about creating entries under the wrong NameType.
Once you find the row for the rider name you want to resolve - select the row for that rider by single clicking it.
Clicking a row causes that row to be highlighted. Clicking a row also causes the fields for ID, Name1, Name2, NameType, and the Active checkbox to auto-populate with data from the selected row.
Screenshot showing the Resolved Rider Names Wizard after single clicking a row in the the (big) CXNNames Table listbox:
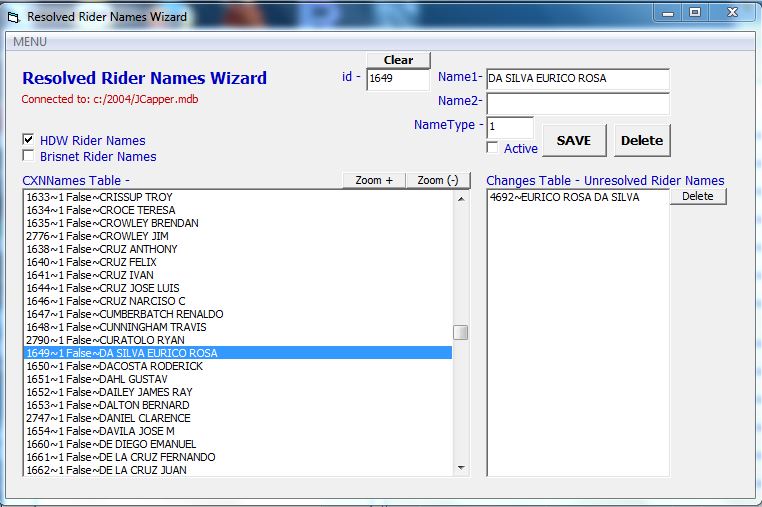
Note that in the above screenshot the Name2 field did not auto-populate. This is because the selected row does not (yet) have an entry in the Name2 field.
Also note that in the above screenshot the Active box is not yet checked. This is because the Active field for the selected row has a value of false.
- Select the desired Unresolved Rider Name from the Changes Table Unresolved Rider Names listbox by single clicking it.
Clicking an Unresolved Rider Name from the Changes Table Unresolved Rider Names listbox causes the Name2 field (and nothing else) to auto-populate with the unresolved rider name.
Note: If the Changes Table Unresolved Rider Names listbox is empty - that means there are no entries for unresolved rider names in the Changes table - and that there is no reason for you to be in this screen.
- Check the Active box.
Screenshot showing the Resolved Rider Names Wizard after single clicking a row in the the (smaller) Changes Table Unresolved Rider Names listbox and after checking the Active box:
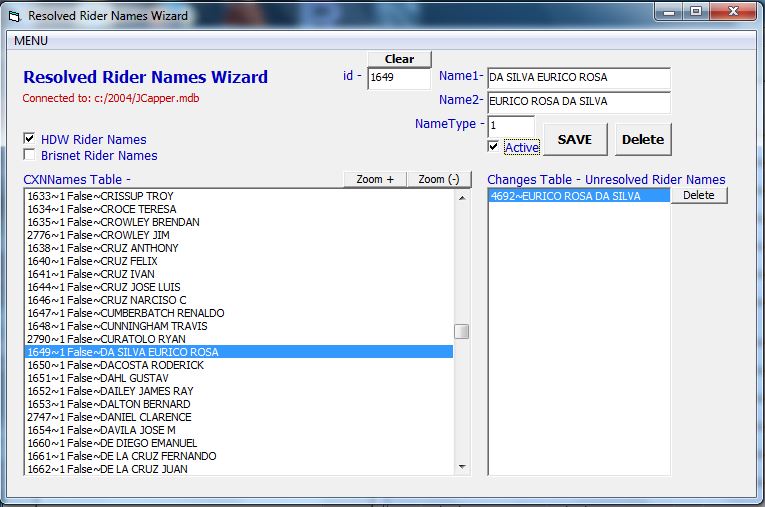
Note that in the above screenshot the Name2 field is now auto-populated and the user has checked the Active box.
- Double check your work and click the Save button to write the (now) Resolved Rider Name entry to the table.
Screenshot showing the Resolved Rider Names Wizard after creating a Resolved Rider Name entry and clicking the Save button:

Note that in the above screenshot:
- The NameType field contains a value of 1 to indicate an HDW Rider Name (auto-populated by the interface when the user selected a row in the (big) CXNNames Table listbox.)
- The user checked the Active box (for True.)
- The text in the Name1 field (upper right) matches the rider name in the data file with all punctuation characters stripped out (auto-populated by the interface when the user selected a row in the (big) CXNNames Table listbox.)
- The text in the Name2 field (upper right) matches the rider name in the XML with all punctuation characters stripped out (auto-populated by the interface when the user selected a row in the (smaller) Changes Table Unresolved Rider Names listbox.)
- The user has just clicked the Save button. From here, clicking YES at the prompt will cause the interface to write the Resolved Rider Name entry to the table.
That's It!
Once you resolve a rider name by creating a proper entry in the CXNNames Table - from that point forward - Scratch BOT will be able to process that rider name each time it is parsed from the XML.
-jp
.
<-- Back to Table of Contents
BASIC OPERATING INSTRUCTIONS for using the Manual Rider Changes Screen to key and process manual rider changes:
- Use the DFM Card Loader to load one or more data files into the program.
- Launch JCapper Scratch BOT, click MENU, and select Manual Rider Changes to launch the Manual Rider Changes Screen.
On the Manual Rider Changes Screen:
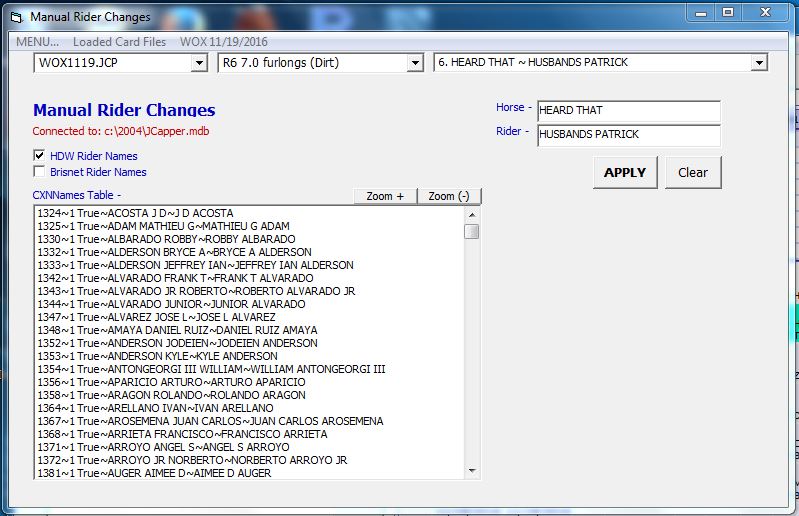
- Select a loaded card file from the Loaded Card Files drop down.
- Select a race from the Races drop down.
- Select a horse and rider from the Horse and Rider drop down.
This will cause the interface to populate the Horse field with the name of the selected horse. This will also cause the interface to populate the Rider field with the rider name (as it currently exists in the data file) for the selected horse.
Screenshot showing the Manual Rider Changes Screen after selecting a loaded card file, race, and horse and rider from the drop downs:
- Check the Data Vendor box (HDW or Brisnet) to make the interface display rider names of the correct NameType for the data file selected in step 3 (above.)
If the correct box is already checked for the selected data file - fine. (Just move on to the next step.)
- Use the vertical scrollbar along the right hand edge of the CXNNames Table listbox to scroll through the existing entries in the table - until you come to the row that contains data for the rider whose name you want to use as the replacement rider.
Sorting of rider names for the CXNNames Table listbox is such that active entries (those with a value of -1 or True in the Active field) are displayed first. Inactive entries (those with a value of 0 or False in the Active field) are displayed next.
Also, the data fields displayed in each (single) row of the CXNNames Table listbox (from left to right) are as follows: ID, NameType, Active, Name1, and Name2. (The squiggly line character is used as a field separator.)
If you have recently run a Populate CXNNames Table Routine (or if you are an HDW data customer) chances are good that the Name1 field for the rider you want to use as a replacement rider can be found in the CXNNames Table listbox.
Hint: The first place you should look when scrolling through the rider names in the CXNNames table - is the Name1 field - of the active names.
If the Name1 you want to use for replacement rider isn't found among the active riders - then scroll down - and look for the desired replacement rider Name1 among the inactive riders.
Once you find the row that contains the Name1 you want to use as the replacement rider - select that row by single clicking it.
Clicking a row causes that row to be highlighted. Clicking a row also causes the interface to auto-populate the Rider field with the Name1 value from the selected row.
- Alternately, if the Name1 you want to use for replacement rider isn't found in the CXNNames Table at all -- you can manually key the Name1 you want to use for replacement rider directly into the Rider field.
Screenshot showing the Manual Rider Changes Screen after selecting the row for the desired replacement rider from the CXNNames Table listbox:
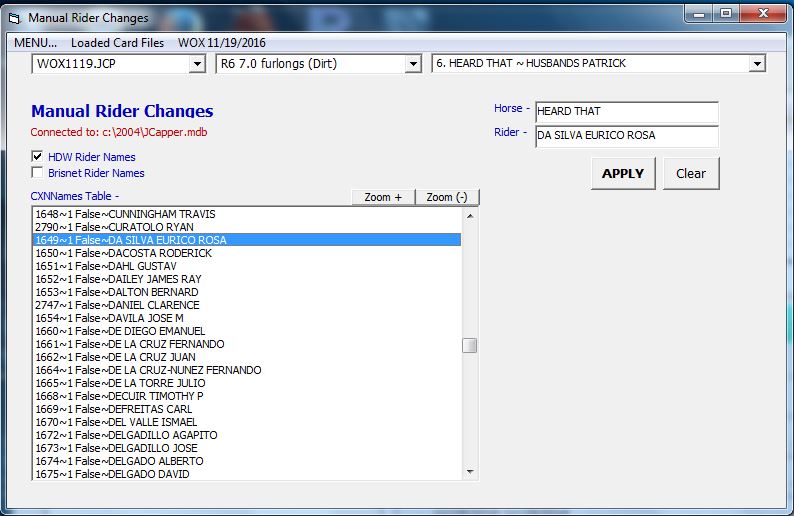
Note that in the above screenshot the interface has auto-populated the Rider field with the Name1 value from the selected row in the CXNNames Table listbox.
- Double check your work. Then click the APPLY button and answer Yes at the prompt to process the rider change.
Screenshot showing the Manual Rider Changes Screen after keying a manual rider change and clicking the APPLY button:
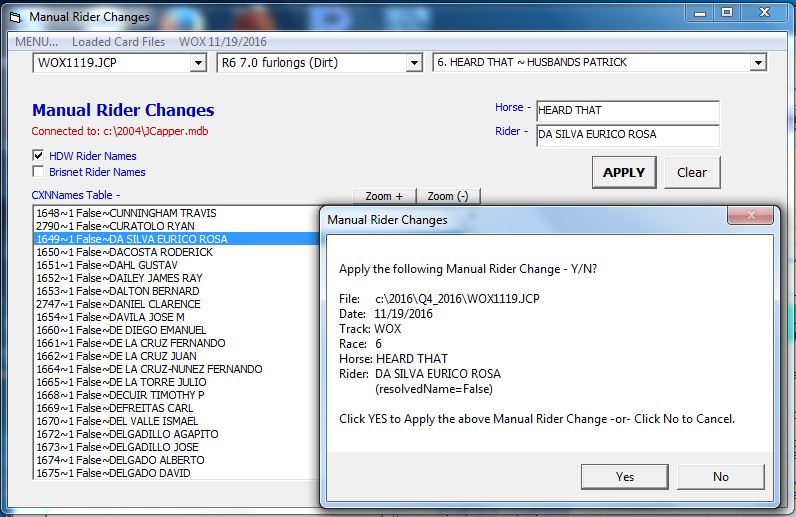
That's It!
Your manual rider change has now been processed.
Notes and Comments:
Processing of Rider Changes:
Here's what happens when Scratch BOT processes a rider change:
- Scratch BOT writes metadata about the rider change to the Changes table. This enables you to see rider changes on the Changes Table Report.
- Scratch BOT makes a temp backup copy of the data file where the rider change is taking place. (The file extension of the temp backup is: .TBK.)
- Scratch BOT opens the data file and finds the horse where the rider change is taking place.
- Scratch BOT replaces the existing rider name with the replacement rider name.
- Scratch BOT scans all horses in the open data file and checks to see if the replacement rider has other mounts.
- If the replacment rider has other mounts in the same data file:
Scratch BOT has access to stats for the replacement rider. Scratch BOT then replaces the (existing) rider stats for the current horse being processed with stats for the replacement rider.
- If the replacment rider has no other mounts in the same data file:
Scratch BOT cannot access stats for the replacement rider. Stats for the replacement rider are then treated as unknown - and Scratch BOT replaces the (existing) rider stats for the current horse being processed with replacement rider stats that approximate the mean (based on a large Data Window sample) of all riders everywhere.
I decided to use stats that approximate the mean (from a data science perspective) because:
- Using the mean is better than leaving stats for the original rider (who isn't riding) intact.
- Using the mean (in certain circles) is a generally accepted way to treat outliers. (Are we not dealing with an outlier situation in cases where stats for a replacement rider cannot be known?)
- Using the mean is better than using no stats at all (or using zero values.)
Scratch BOT writes the data file (edited for replacement rider and stats) to the hard drive.
Scratch BOT deletes the temp (.TBK) backup file.
At this point, the rider change is complete.
-jp
.
<-- Back to Table of Contents
BASIC OPERATING INSTRUCTIONS for Connecting to a JCapper .mdb File:
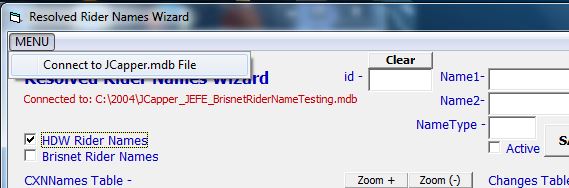
- Launch the CXNNames Table Interface, the Resolved Rider Names Wizard, or the Manual Rider Changes Screen. (Each can be connected to a JCapper .mdb file using the Connect to JCapper.mdb File menu option.)
- Click MENU, select Connect to JCapper.mdb File, and click YES at the prompt to bring up a Dialog Box.
Screenshot showing the Resolved Rider Names Wizard MENU just before selecting Connect to JCapper.mdb File:
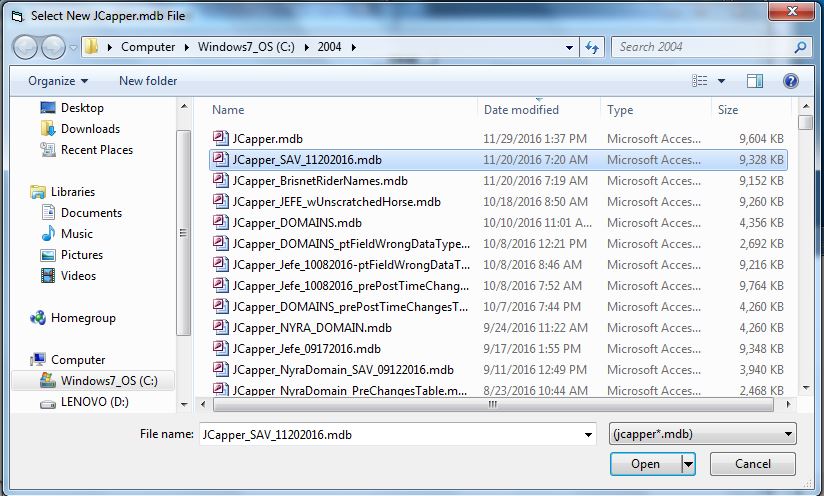
- Use the Dialog Box to select the JCapper .mdb file you want to connect to:
- Single click the file you want to connect to.
- Double check your selection.
- Click the OPEN button on the Dialog Box and click YES at the prompt to finalize your selection.
Screenshot showing the Dialog Box after single clicking a JCapper .mdb file to select it and just before clicking the OPEN button to finalize the selection:
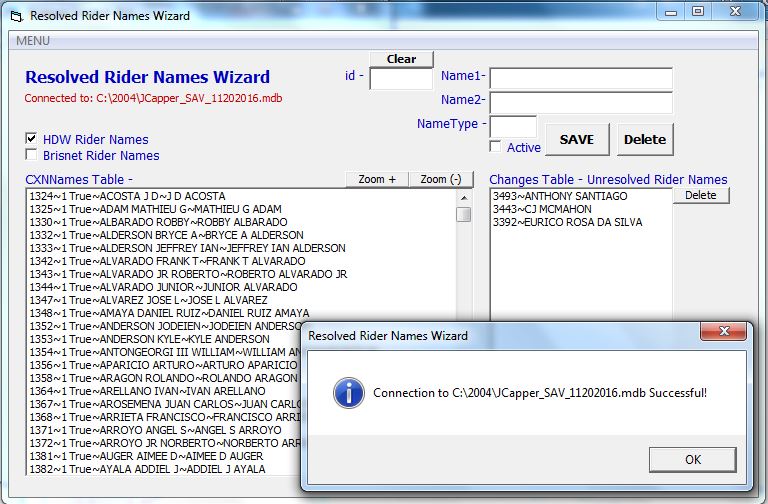
Screenshot showing the connected to file displayed on the face of the module after clicking the OPEN button on the Dialog Box:
That's It!
Notes and Comments:
Maintaining Multiple JCapper .mdb Files:
The above Dialog Box screenshot should make it clear that I maintain multiple JCapper .mdb files.
I do this for several reasons.
First (as the program author) I'm always working on new ideas for JCapper. Sometimes new ideas require new tables and/or data fields. It's easier (for me) to maintain those new tables and database fields in separate files - rather than mix them in with the current JCapper .mdb files that I use for live play.
Second (as a horseplayer) I'm always working on new ideas for live play. Sometimes those new ideas are track and/or season specific - and involve changes to UPR, UserFactors, and UDMs. This part is a personal choice - but it makes more sense (to me) to maintain my ideas for different methods of live play in separate files - rather than in a single JCapper .mdb file. That way I can switch out files on the fly as the need arises.
Best Practice:
Whether you maintain multiple JCapper .mdb files or a single JCapper .mdb file -- Best practice involves maintaining backups -- on external drives AND off site -- on a regular basis -- ALWAYS.
That way, should disaster strike -- You'll have an easy recovery path for your work.
-jp
.
<-- Back to Table of Contents
BASIC STUFF YOU NEED TO BE AWARE OF:
This section of the help doc is still being written.
Check back frequently for updates...
-jp
.
Final Thoughts and Comments:
This section of the help doc is still being written.
Check back frequently for updates...
-jp
.
|