HDW File Manager Help Doc
HDW File
Mgr Videos Updated 10/01/2025
HDW File Mgr Videos
Maximize the Player to Watch & hit the Escape key to shrink afterwards
Video #1 – HDW File Download Tool - Logging into the HDW Site for the very first time:
Video #2 – Download Today's .JCP Files and Yesterday's Chart Result Files from the HDW site:
Video #3 - Switching Back and Forth Between Calendar Folders in the DFM and HDW File Mgr:
• In the above video I use the +All button to highlight every chart file available for download on the HDW server.
•That works when all of the chart files belong on the Current Active Data Folder displayed on the Download button.
•The video was recorded 12-31-2024 when all of the available chart files were from Q4 2024.
•So the +ALL button works for that date (12-31-2024)
•But you can't use the +ALL button when the 45 days of files on the HDW server span multiple Quarterly Folders.
Video #4 recorded on 01-02-2025 - Corrected Charts When the Available Files on the HDW Server Span Two Calendar Quarters:
• Know your JCapper Folder Structure.
• Use the DFM and HDW File Mgr to set the Current Active Data Folder before you download.
• Download your files to the correct Folder.
Video #5 recorded on 10-01-2025 - Downloading HDW Files on the First Day of a New Calendar Quarter in JCapper 2025:
• Know your JCapper Folder Structure.
• Use the DFM and HDW File Mgr to set the Current Active Data Folder before you download.
• Download your files to the correct Folder.
--Hint: Also watch Videos #1 and #2 in the DFM (DataFolder Mgr) Help Doc (Doc #5 on the Help Docs Page at JCapper.com)
General Overview
The purpose
of JCapper's HDW File Manager is to provide an interface for:
1. Downloading data and results files from the HDW site onto a target folder.
2. Unzipping downloaded files.
3. Building JCapper compatible .JCP Data Files from the downloaded binary HDW files.
4. Building JCapper compatible .XRD Results Files from the downloaded HDW Charts Text Files.
File Compatibility
JCapper is designed to run on .JCP Data Files built from the raw binary files downloaded from the HDW site. Put a different way: After downloading files from the HDW site you must then use the HDW File Manager to build JCapper compatible files from the raw data files downloaded from the HDW site.
The build process is easy to do and relatively fast. It takes between 3 and 4 seconds per data file and less than one second per results file.
Instructions for building JCapper compatible data and results files can be found below in the Building JCapper Compatible Data and Results Files section of this Help Doc as well as in the companion videos.
Companion Videos
Goto JCapper.com and click the link labeled JCapper 101 Audio Video. Look for the Index section labeled "Working With HDW Data" and give it a click. There, in the Working With HDW Data Section you will find videos showing the HDW File Manager being operated to:
1. Download files from the HDW Site.
2. Build JCapper compatible files from the raw data files downloaded from the HDW Site.
Default Data Folder
Like all JCapper modules, when first launched, the HDW File Manager will auto point itself at your Default Data Folder.
The same Folder Icon - Folder Nav Tools Interface which is used throughout JCapper is provided to allow the user to re-point the module at target folders other than the Default Data Folder at user discretion.
Hint: Recommended best practice is to get in the habit of always using the Data Folder Manager to set/control your Default Data Folder BEFORE launching ANY JCapper module - including the HDW File Manager. Doing this will prevent you from accidentally saving/building files onto unintended folders.
Launching the HDW File Manager
To launch the HDW File Manager, find the button on the face of the JCapper Main Module labeled "HDW" and give it a click. This will launch the HDW File Manager.
Downloading Files From the HDW Site
There are two methods for downloading files from the HDW site:
1. Using a web browser (and HDW's Java App) to browse the HDW site.
2. Using the JCapper-HDW File Download Tool found in JCapper's HDW File Manager.
The File Download Tool
Launching the File Download Tool
Launch the File Download Tool by clicking the button labeled HDW File Download Tool on the main screen of the HDW File Mgr.
General Purpose
The purpose of the File Download Tool is to provide a user interface for logging into the HDW site, queing up a list of data and results files, selecting data and results files from the que list, and downloading selected files to a target folder.
File Download Tool Visual Elements
Userid and Password Boxes
Key your
HDW userid and password (not your JCapper program userid and password) into the
boxes provided and check the “remember me” box. The interface will persist your logon credentials in an encoded format so that
the module can use bring them up and use them each time you launch the module.
Clear Button
The clear
button clears the stored HDW userid and password from the text boxes.
Show Button
The show button displays the HDW userid and password in characters that are readable to the human eye.
Login Button
Give it a click after entering your HDW userid and password into the textboxes. If you entered the correct userid and password into the boxes you will be authenticated.
If you messed up and entered a bad userid or password, you will get a dialog box directly from the HDW site so that you can log in. If this is the case, you must also re-key a correct userid and password into the userid and password textboxes on the module itself before you will be able to use the module to download files.
Que Files Buttons
There are 3 Que Files buttons:
1. Que Data Files
2. Que Charts Files
3. Que Both
Clicking a Que Files button will populate the File List Box with all files of the type selected that are currently available for download on the HDW site. If the file list box fails to populate when you click one of the Que Files buttons, chances are that you have a bad userid and/or password keyed into the module's login credentials boxes.
From here it's a matter of:
1. Using the Folder Nav Tools to point the module at a target folder where you want to save files... the default will be your Default Data Folder.
2. Selecting/highlighting files from the file list box that you want to download.
3. Clicking the Download button beneath the File List Box to download files onto the target folder. (Only highlighted files are downloaded.)
4. Closing (x-ing out of) the File Download Tool to get back to the File Mgr itself and then using the File Filter Tool (Auto-Pilot makes it easier) to find, unzip, build, and archive downloaded files.
Notes:
1. The module uses a dll named "wininet.dll" which is not inlcuded in the download package... but it should already be on your machine... It is included as part of Internet Explorer.
2. Be Careful with the Synch to Disc Button... READ how it works first...
The Synch To Disc Button
Clicking the Synch To Disc button causes the module to compare all of the files in the list box against files sitting on the pointed to target folder. Any file that's available for download on the HDW site that you've queued up will be auto-highlighted if it isn't found on your target folder.
For that reason, when you click the Synch button you will be prompted to filter your file list by month... which is intended to work for people who are using a monthly file folder structure.
If you don't know what you are doing you can easily download 900+ files onto a target folder before you realize it... If you are using a monthly file folder structure it's possible even likely that you really wanted most of those 900 files to be saved to some other folder.
Hint: Think Before You Act... Look at the files that you have highlighted and decide if they really belong in your target folder before clicking the Download button.
The File Download Button
Clicking the File Download Button causes all selected files in the file list box to be saved to the current pointed to target folder.
The File Filter Tool
Building JCapper Compatible Data and Results Files
After downloading data and results files from the HDW site, you must then build JCapper compatible .JCP data files from the HDW binary files downloaded from the HDW Site.
You must also build JCapper compatible .XRD Results Files from the HDW Charts Text files downloaded from the HDW Site.
Launching The
File Filter Tool
To launch The File Filter Tool, find the button labeled "File Filter Tool" on the face of the HDW File Manager and give it a click.
File Filter Tool General Overview
The File Filter Tool provides a user interface (UI) that allows the user to:
1. Set
parameters so that files downloaded from the HDW site can be found on a target
folder.
2. Unzip
files downloaded from HDW and extract the contents onto the target folder.
3. Build
JCapper compatible .JCP Data Files using the raw HDW binary race files as the
source.
4. Build
JCapper compatible .XRD Results Files using HDW Charts Text files as the
source.
5. Archive the raw HDW binary files and HDW Charts Text Files – moving them off of the target folder and onto the archive folder.
File Filter Tool Visual Elements
Start
and End Date Drop
Drop Downs are provided to enable the user to define start date and end date before the file build process is initiated.
Calendar Control for Start Date and End Date
Alternatively, the user can define start date and end date using the Calendar Control before initiating the file build process.
Track Code Textbox
To limit the file build process to a list of user defined track codes, key a list of valid track codes into into the textbox before initiating the file build process.
The
interface will recognize the first 3 characters of the file name as a valid
track code. For example, SAR is the valid track code for
Exception: For some tracks, the file naming convention for the track uses a two character code instead of 3 characters. For such tracks, add an "X" character (without the quotes) to the two character track code to get a valid track code. Example: Santa Anita is traditionally given the 2 character track code of SA. After adding the X character, the valid track code for Santa Anita becomes SAX.
Specifying
Multiple Track Codes: To specifiy multiple track
codes before initiating the file build process, simply separate each valid
track code with a dash character.
Example: Keying SAX-GGX-OPX-FGX into the track codes textbox before initiating
the file build process will restrict the files built to Santa Anita,
Target Folder
When the File Filter Tool is launched it will auto point at the same target folder as the HDW File Manager. The current pointed to target folder is displayed (visual indicator) along the very top of the File Filter Tool on the module's tilte bar.
The target folder can be set prior to launching the File Filter Tool by one of two ways:
1. Using the Folder Nav Tools built into the HDW File Manager to set the current pointed to target folder.
2. Using the Data Folder Manager (before launching the HDW File Manager) to set the current pointed to target folder.
File Type Dropdown
The current selection made in the File Type Dropdown at the point in time that the Apply Button is clicked controls the type of file that will be created/built during an initiated File Build Process.
The two available choices that can be made in the File Type Dropdown are:
1. HDW J Binary Race File (*J*.*) - If this file type is selected when the Apply Button is clicked, JCapper compatible .JCP Data files are created during an initiated file build process.
2. HDW Chart Results File (*F.*) - If this file type is selected when the Apply Button is clicked, JCapper compatible .XRD Results files are created during an initiated the file build process.
Initiating a File Build Process
The Apply Button
Clicking the Apply Button while the Auto Pilot Checkbox is checked causes a file build process on the current pointed to target folder to be executed.
The following separate subroutines collective make up an initiated File Build Process:
1. Raw HDW files contained in .Zip files downloaded from the HDW site are unzipped/extracted from the .Zip files downloaded from the HDW site onto the current pointed to target folder.
2. New JCapper compatible files - either .JCP Data Files or .XRD Results Files depending on the selection made in the File Type Dropdown - are created/built (using the raw HDW Files as the source) on the current pointed to target folder.
3. Raw HDW Files are removed from the current pointed to target folder and placed onto the archive folder.
The Auto Pilot Checkbox
The default setting for the Auto Pilot Checkbox is that the box is checked. If a file build process is initiated while the Auto Pilot box is checked, each of the individual routines involved in a file build process will be executed in sequence automatically. As a best practice, it is recommended that you simply leave the box checked - eliminating the need to execute the individual steps making up a file build process separately and manually.
The Data Vendor Setting on the User
System Definitions Screen
JCapper
contains separate number crunching algorithms specifically designed for the
data and results files from each of the two supported data vendors. Number
crunching algorithms designed to handle HDW data “fire” when Calc Races and
Build Database routines are executed using data and results files obtained from
HDW. Likewise, a separate set of number crunching algorithms “fire” when
JCapper performs number crunching on Brisnet files.
The Data
Vendor checkbox found on the User System Definitions Screen controls which
algorithms will “fire” during Calc Races and Build Database routines.
If you are
using HDW data: Check the HDW box on the User System Definitions Screen and
click the Save button.
To use
Brisnet data: Check the Brisnet box on the User System Definitions Screen and
click the Save button.
To get to
the User System Definitions Screen: On the face of the JCapper Main Module
click the System Settings button. Then, on the System Settings Interface: click
the button labeled System Definitions.
Note: The User System Definitions
Screen has been referred to as the User Sys Defs Screen in live JCapper
seminars as well as in posts found on the JCapper Message Board.
About HDW Files
Data files
downloaded from the HDW site are delivered in an encoded binary file format.
Files created by HDW are different for each software vendor. JCapper HDW Files
are not compatible for use in other software programs – and vice versa.
You have a
choice when it comes to data providers.
In my
opinion, some of the relevant things to think about when deciding which data
vendor to go with are:
Proprietary Information
I was
actively involved in the file design phase and was able to convince HDW to
include proprietary information in the files they produce for JCapper
customers. This is information that I was working with outside of JCapper. To
my knowledge, this information is wholly unique to JCapper. Having this added
proprietary info in files produced by HDW has allowed me to write number
crunching algorithms to take advantage of this proprietary information.
As a
result, when you use HDW Data Files, JCapper will give you results that are (in
my opinion) superior to what you can expect using Brisnet data. Two examples of
this are JCapper PScore and E~BettorsToteProb… Large sample Data Window results
have proven to my satisfaction that these (and other JCapper factors) are
superior using HDW data compared to Brisnet data.
Consideration
of proprietary information and new JCapper factors aside, HDW data is seen by
fewer pairs of eyes each day than Brisnet data. Always keep in mind that wagering on horses is a pari-mutuel game.
Error Checking
HDW employs
error checking routines designed to catch many of the errors that Equibase has
historically propagated into past performance data. In the short time that I
have been affiliated with HDW (they began offering JCapper data files in March
2010) I have already seen several examples of this. For example, when
fractional times fail to match up with beaten lengths – HDW will “hold off” on
cutting a chart until they can get clarification from Equibase rather than just
publishing a chart with bad information in it. If errors are discovered in the
Equibase data after data and results files have been delivered HDW will
“re-cut” data and results files. This is something not routinely practiced by
other data vendors.
Price: Data Subscription vs.
Downloading Individual Files
Your HDW Data
subscription gets you unlimited file downloads each month. You get both data
and results files for all tracks in
Brisnet
charges by the file. Downloading an entire month of individual data and results
files from Brisnet (without a subscription plan) can easily cost you 6 or 7
times as much money for the same race dates compared to what you would pay with
a subscription from HDW.
HDW Contact Info
HDW Inc.
100 Farmers Bank Square
Suite 120
Georgetown, KY 40324
phone: 502-570-0333
email: HDWInc@gmail.com
Screenshot Gallery
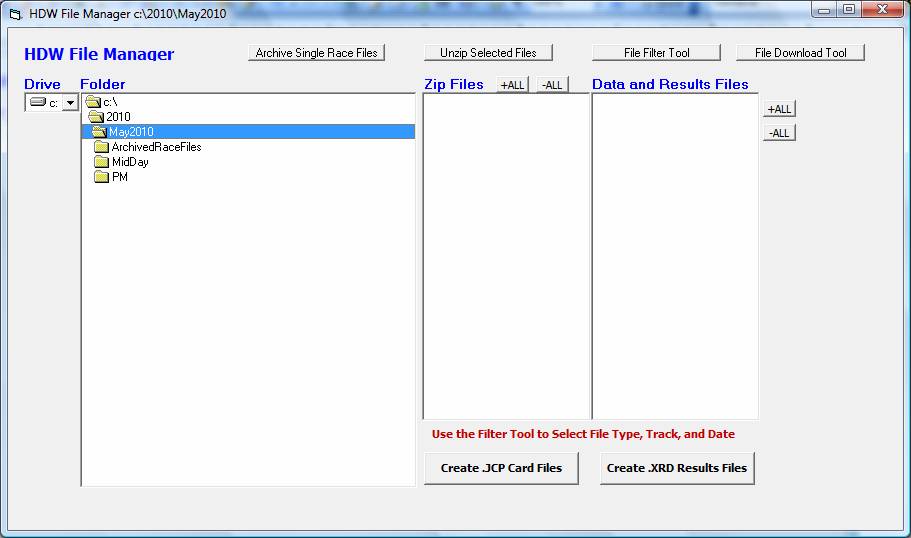
Screenshot above: The HDW File Manager
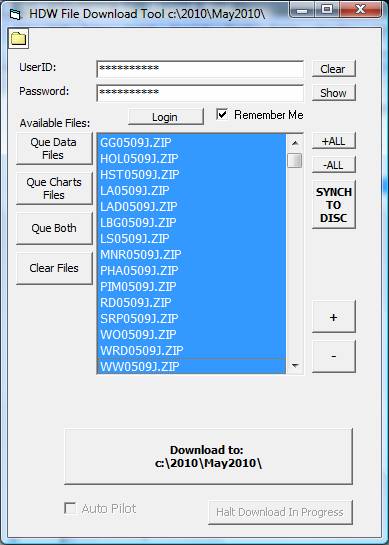
Screenshot above: The File Download Tool
Files are selected and the Download Button is ready to be clicked.
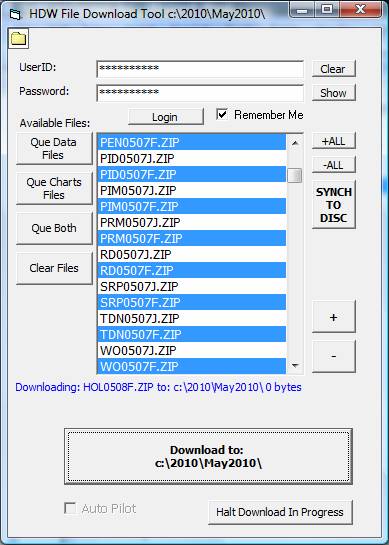
Screenshot above: The File Download Tool
File Download in progress.
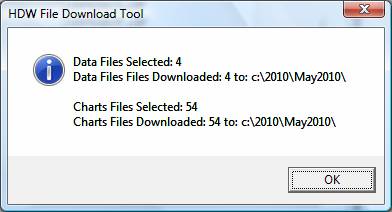
Screenshot above: The File Download Tool
File Download complete.
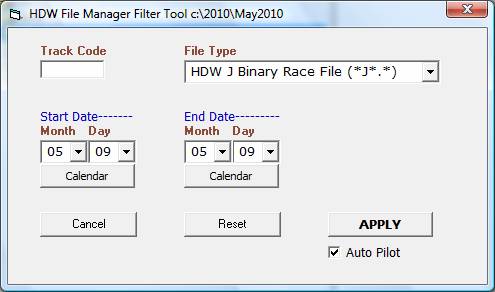
Screenshot above: The File Filter Tool
About to initiate a file build process to create JCapper compatible .JCP Data Files
For 5/9/2010 on the c:\2010\May2010 target folder.
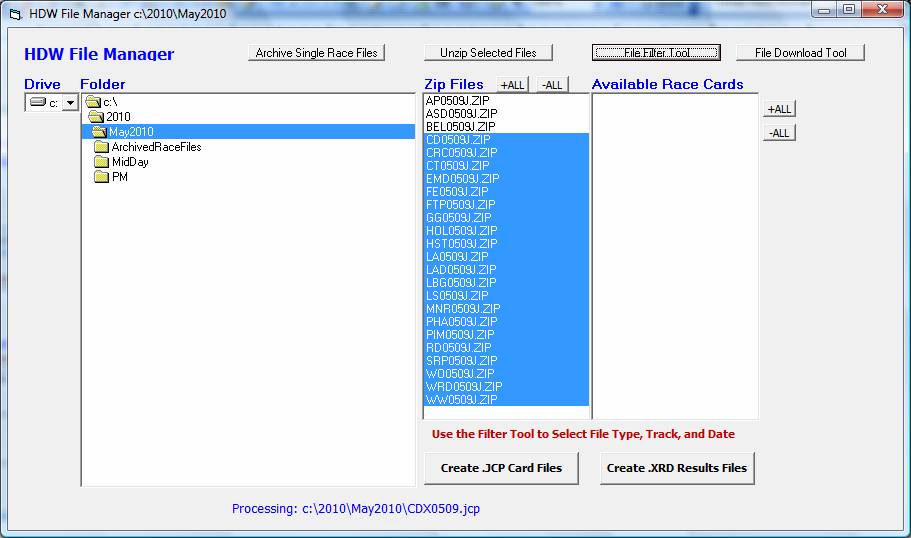
Screenshot above: The HDW File Manager
File build process in progress… creating JCapper compatible .JCP Data Files
For 5/9/2010 on the c:\2010\May2010 target folder.

Screenshot above: The HDW File Manager
File build process complete… JCapper compatible .JCP Data Files
For 5/9/2010 have now been created on the c:\2010\May2010 target folder.
![]()
Screenshot above: The User System Definitions Screen
Note that the HDW Box (upper left
area on the screen) is checked –
enabling JCapper to use data and results files from HDW.